I was going to hold off on this post, but I couldn’t resist. It’s too much fun. Today I made my own skinnies! Super exciting stuff.
Know what I’m a sucker for? Clearance sales. My brain shuts down and I can’t think straight. 75% off? Well, that shirt has three arms, but for $5–heck, I’ll take it! Pants 8 sizes too big? Well, they look a bit silly, but they’re also $7.95. What a dilemma.
I may not be that bad, but pretty close. However, I feel like I have a license to buy ridiculous things because I have a sewing machine AND I know how to use it. Here’s how you can turn your ridiculous looking pants into stylish skinnies–you can do this with dress pants, certain types of jeans, anything. Just make sure your pants have a bit of stretch and fit nicely around your hips/waist.
First thing you do is get your pins out and put your pants on inside-out:

This is an ill-fitting pant if ever I saw one. Even inside out, it’s awful. However, they were also $9.00 at Old Navy. So I bought them. You can see here there are pins on the left. And the right is untouched. What you want to do is pin one leg to the shape and width you want, up and down the outside and inside seams of the pant leg. Because these are skinnies, you want them snug, but if it’s hard to shimmie out of them, then you may have pinned them a little tight. Take your pants off, put new pants on (if you really want to), and take them to your sewing machine–things are about to get heavy.
Some of you may be thinking, “But my sewing machine is not nice. It’s not fancy, it’s not complicated, and it’s old. What if I can’t do this?”
Let me introduce you to my sewing machine:

See that logo? It’s a Kenmore. Does Kenmore even make sewing machines anymore? Don’t get me wrong, I love my sewing machine. It’s awesome. But, as you will notice, it’s very basic. Everything I do is on this little beauty, and my serger. Which is a Hobbylock manufactured sometime in the decade previous to my birth. So don’t go getting sewing machine envy on me. You’ll be fine.
Back to the pants! Take your pants and Baste along the edges. Trust me. Save yourself a lot of tears and heartache and baste first. Always baste first. One note on the basting: begin sewing on the original seam line and very gradually sew to your first pin. If your line from the original seam to your new seam is too sharp, you’ll get a weird bubble. Don’t do that. Avoid the bubble. Then, turn those puppies right-side out again and try them back on.

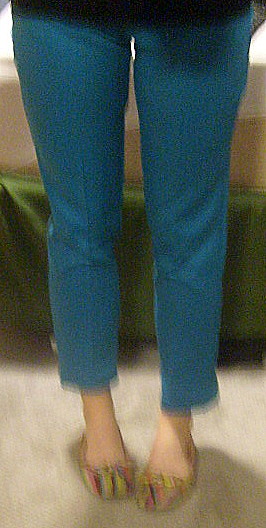
Please take a moment to enjoy the photo bomb by Yellow Dog. Then, notice how different the legs look!
Take your pants-in-progress off again and then take them to a clear, flat surface–something like an ironing board, long table, etc. Lay your pants flat and inside out. what you are going to do next is this: lay your basted leg on the table and flatten it out. fold the pants in half length-wise along the crotch seam. match up the bottom cuff of the pants. Line up one edge seam at a time–the unsewn leg to the sewn leg. There are no pictures of this process, I sort of made it up as I went along. Also, don’t sweat this part. It’s really easier than it sounds, and once you do it, you’ll see for yourself.
So your legs are matched up and you’re ready to make the second leg look the same as the first leg. Take a pin and stick it straight up through both legs. This pin is going right through your first seam and its marking where your seam on the second leg will run. While this won’t be an exact, to-the-32nd inch-thing, it will be close enough to count, and no one will be able to tell the difference. Repeat this pinning process up and down your seams of the second leg. Then baste, and try them on.

We’re getting closer! I took in a little more at the knees and did a little fine-tuning to get the fit I wanted.
This is the proverbial light at the end of the tunnel! Turn your pants inside out again and stitch over your basting, making sure to back stitch and all that good stuff. Then secure your side seams by either using your serger or trimming your extra fabric and running a zig-zag stitch along the edges. You don’t want a whole lot of extra fabric, so trim to about a 5/8.”
Next what you are going to do is determine the length of your pants. I’m a shortie, so I took about 5″ off the bottoms of these. Simply fold up the bottom hem to the point you want them sitting and fold up. Measure this length and turn up the second leg to the same length. Then trim your hem 1″ longer than you want your final length to be and either sew a turned-under hem or simply serge and then sew your bottom hem.
That’s it! You’re done! Unless…

You know those skinny pants with a bit of ruching on the bottom? Well, you can do that. It’s easy. 1. Determine how much ruching you want. I went for 4.” 2. Take some 1/4″ elastic and stretch it as far as it will go and then cut it at 6.” If you want more or less ruching, it’d a bit of trial-and-error. I’m not sure on the exact conversions, but I do know that 6″ stretched elastic=4″ cute detail at the bottom of your pants.
Anywho, to sew your ruching: line up your elastic on the wrong side of the fabric on the side seam line. Manually lower the needle to the elastic and sew a few stitches and then back stitch a few. Then, pull on that elastic and stretch is as far as it will go. This part gets a bit tricky because you are doing several things at once: pulling on the elastic, making sure it’s lining up with the seam (so your stitching is invisible), making sure other parts of the leg doesn’t get caught up in your stitching, and trying to sew straight. Have patience, you’ll get it. And if all else fails, keep your seam ripper handy. Sew an elastic piece on each side seam at the bottom, and you’ll have this:

Sorry for the blurry photos, did I mention the camera I’m using takes AA batteries? Please take another moment to enjoy yet another photo bomb by Yellow Dog (she was very needy today) and then see how supercute these bottoms are? Supercute.

There. Ill-fitting clearance pants to adorable outfit in a little over an hour. That means you can make several pair in an afternoon. See?


Love this! I want to get a sewing machine now. Is Yellow Dog inspired by Mr. Schaeffer’s Brown Dog? Thanks for the posts!